Category Archives: How To

How to Fix a Flickering Screen Error in Windows 10

Let’s face it: Windows 10 isn’t a perfect OS. Like any operating system, it has some problems. Some problems can be easily ignored or worked around, and others are a dealbreaker.

Some users are reporting just such a problem in the form a flashing or flickering screen in Windows 10. This leaves them unable to do anything while it’s happening, and is just a huge annoyance. But fear not, because we’ll show you how to fix the problem for good! No more restarting every time in hopes that it goes away.

First, you’ll need to run msconfig, a useful Windows utility that lets you change your startup functions and disable services running in Windows. To launch it, you can just type msconfig into the Windows search box, or open open a run window and type msconfig there.

2016-06-15_161059

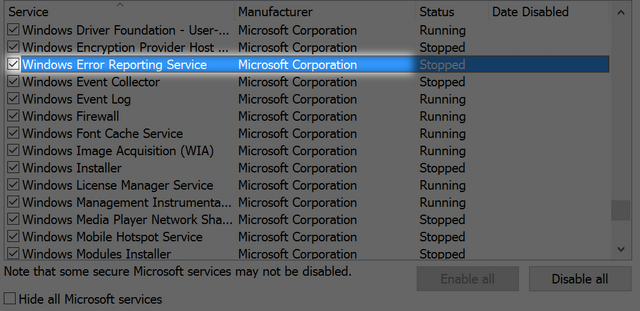
Now, head to the Services tab and disable the following two: Problem Reports and Solution Control Panel and Windows Error Reporting Service. To disable them, uncheck the box next to them. Restart your computer, and when it comes back, you shouldn’t have any more issues with your screen flashing!

How to Get Rid of Lock Icons on Encrypted Folders in Windows

Do you share your computer with other people? One of the best ways to keep your files secure when other people are using your PC is to encrypt them. Windows makes it easy to do this, but there is a slight drawback.

By default, when you encrypt a folder Windows displays a little lock icon over it. Generally, you don’t encrypt folders for no reason, so this is basically advertising to others that there’s something in there that you don’t want them to see!

Fear not, because you can actually get rid of this lock icon, it just requires a tiny bit of registry tweaking.

First, type regedit into the Windows 10 search box. Once it opens, navigate to the following key:

HKEY_LOCAL_MACHINE\SOFTWARE\Microsoft\Windows\CurrentVersion\Explorer\Shell Icons

If the Shell Icons key doesn’t exist, you’ll need to create it. To do so, scroll up to the Explorer key,right-click it, choose New, and select Key. Name the key Shell Icons.

2016-06-16_163815
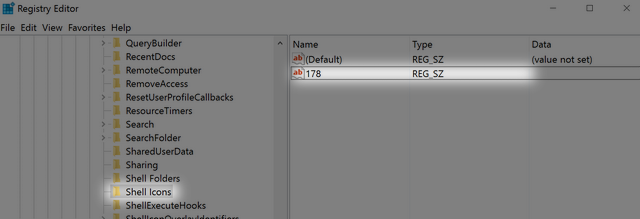
If you already have the key, you’ll need to create a new string value named 178. To do so, right-click Shell Icons, then select New, followed by String Value. Name it 178.

The next bit is a little complicated. You’ll need to make a blank icon file(.ico). TheWindowsClub has created one on this post (download here). Make note of where you saved the icon file, and edit the string for 178. To do so, right-click  it and select Modify. Insert the path of the blank .ico file.

Now, your encrypted files won’t have the big obvious lock telling anyone who uses your PC that you’re trying to hide something!

How to Auto-Forward Emails to Multiple Addresses in Gmail

Gmail’s forwarding feature makes it easy to automatically pass emails on to other accounts without any effort on your part. With Gmail’s filter feature and a few extra steps, you can also automatically forward emails to multiple accounts.

Step One

The first step is to set up the email forwarding. Go to Settings > Forwarding and POP/IMAP. Click the Add a forwarding address button. This will send an email to each address you wish to automatically forward emails to with a confirmation link that has to be clicked.

forwarding

You will have to repeat this step for each email.

Step Two

Once each of the emails have been confirmed, you can create a filter for the messages you want to forward. With the filter feature, you can automatically forward emails with a specific subject line, from a specific sender, or even messages with  specific keywords.

filter

Under Gmail’s Settings go to Filters and Blocked Addresses and click the Create new filter button. You can fill in the details for the emails you want to forward. Once you’ve filled it in, click Create filter with this search.

Step Three

The next step is to choose the emails you want to forward the emails to. Make sure to check “Forward it” and from the dropdown menu select the email addresses that have been confirmed.

filter2

Unfortunately, because of the way that Gmail forwarding works, you will have to repeat this step each time for each email you want to forward to.